How To Remove Popcorn Ceiling Easily

Popcorn ceilings, once a staple in mid-20th-century homes for their acoustic dampening and ability to hide imperfections, have fallen out of favour in modern interior design. Nowadays, homeowners seek more contemporary, smoother finishes as a replacement to this dated aesthetic. As a result, it’s becoming increasingly popular to remove popcorn ceilings, also known as stucco ceiling removal, in your home. 

Today, the Prestige Painting & Contracting team will walk you through a detailed, step-by-step process on how to remove popcorn ceilings, the essential tools required, critical aftercare tips, guidance on when to bring in professionals, and much more!

For all seasoned DIYers out there or new homeowners planning their first ceiling project, this guide covers everything you need to know and how to prepare the room.

Tools Required

Proper preparation with the right tools makes the renovation smoother and helps achieve professional-level results.

How to Prepare Your Room for Popcorn Ceiling Removal

  • Do a Scrape Test:
    Getting rid of a popcorn ceiling doesn’t have to be a pain. Before getting out the heavy equipment, try a simple scrape test to see how easily the popcorn application will come off. First, try with a small scraping tool on a dry ceiling. Make sure to wear a mask and eye protection. Then try again, first dampening the ceiling to see if water will make removal easier. If the water absorbs easily, then this means they haven’t been painted and the popcorn should be removed easily. Depending on the age and condition of your ceiling, you will quickly be able to determine if dry or wet is a better way of removing popcorn ceilings.
  • Test for Asbestos:
    Popcorn ceiling can be a health hazard. As noted earlier, it’s important to wear a mask during the removal of a popcorn ceiling. Not only are you dealing with dust and debris, but you may also run the risk of asbestos exposure. Popcorn ceilings installed before 1980 should be tested for asbestos, a potential cancer-causing chemical that has been banned. You can test for asbestos by taking a small sample to your health department. If asbestos is present, hire a professional contractor to remove the popcorn ceiling to prevent exposure to you and your family.
  • Prep for a Big Mess:
    Just like spilling a real bowl of popcorn in real life, removing a popcorn ceiling is messy. Before you begin, it’s recommended to cover your floors, walls, and valuables with plastic coverings or drop cloths to prevent dust and debris from causing damage. Do not use drop cloths that are absorbent to avoid water soaking through. Do not remove the coverings until you are sure there is no more falling debris.
  • Remove Furniture:
    Plastic Drop cloths are a helpful way to prevent damage from popcorn ceiling removal, but it may be more practical to remove furniture from the room completely. Dry and wet debris can cause damage to upholstery, so when possible put your couch, chairs, or other valuables in a different room.
  • Remove Ceiling Fixtures and Fans:
    Popcorn ceilings can be difficult to remove if accessories are hanging from the ceiling. Remove drop lighting such as chandeliers, hanging lights, or globe lights to ensure you can access all areas of the ceiling for complete and efficient removal.
    Ceiling fans and other ceiling decors can get in the way when removing the popcorn ceiling. Carefully remove any ceiling fixtures to ensure easy removal and to prevent damage.
    Plug any holes with cloth or paper to avoid damage to wiring.
Popcorn Ceiling Removal Services by Prestige Painting GTA
  • Protect Recessed Lights From Water Spray:
    Water spray is not only messy, but it can damage your wiring or fixtures. Make sure to cover any recessed light or gaps in the ceiling with cloth or paper to avoid the risk of electrocution or damage.
  • Wet it With a Pump Sprayer:
    Once you have determined if your popcorn ceiling is best removed dry or with water, then you can move onto removal. If you have found that water is the best way to proceed, use a pump spray to mist the ceiling, letting it soak in for a few minutes. This will make it easier to remove popcorn ceilings using a scraper. Do not use too much water to avoid damage to the ceiling or drywall.
    If you find that the water application has not softened or loosened the popcorn ceiling, then it may have been painted and will require dry scraping or covering with T&G boards or drywall.
  • Cover Electrical Boxes and Outlets:
    Taking all necessary safety precautions is key to the safe and successful removal of the popcorn ceiling. Make sure to shut off the power to junction boxes in the ceiling. Cover them with electrical tape and ensure any exposed wiring is wrapped in painter’s tape or covered with cloth. Once the job is complete, remove any coverings, and turn the power back on.
  • Work In Small Sections:
    Popcorn ceiling removal is best done by working in small sections. Imagine a grid on your ceiling and work in 4 ft by 4 ft sections to ensure the popcorn is removed effectively. If you spray the entire area, it will dry too quickly forcing you to reapply and potentially cause water damage.
  • Tame the Mess With a Mud Pan:
    Removing wet popcorn can be messy. It is recommended to use a pan to catch any debris such as a mud pan. Make sure to use the pan to scrape off any excess popcorn debris to avoid it falling on your floor or furniture.
  • Prevent Gouging:
    Removing a popcorn ceiling is delicate work. It is advisable to round off the corners of your scraper or knife to prevent gouging your ceiling. Remember to not use too much water to avoid weakening your ceiling and always make sure your ceiling is dry before moving on to filing or sanding.
  • Smooth After Scraping:
    The most satisfying part of the job of replacing your popcorn ceiling is smoothing the ceiling once all the popcorn has been removed. Take the time to fix any gouges or scratches and then carefully sand and smooth your ceiling in preparation for painting.

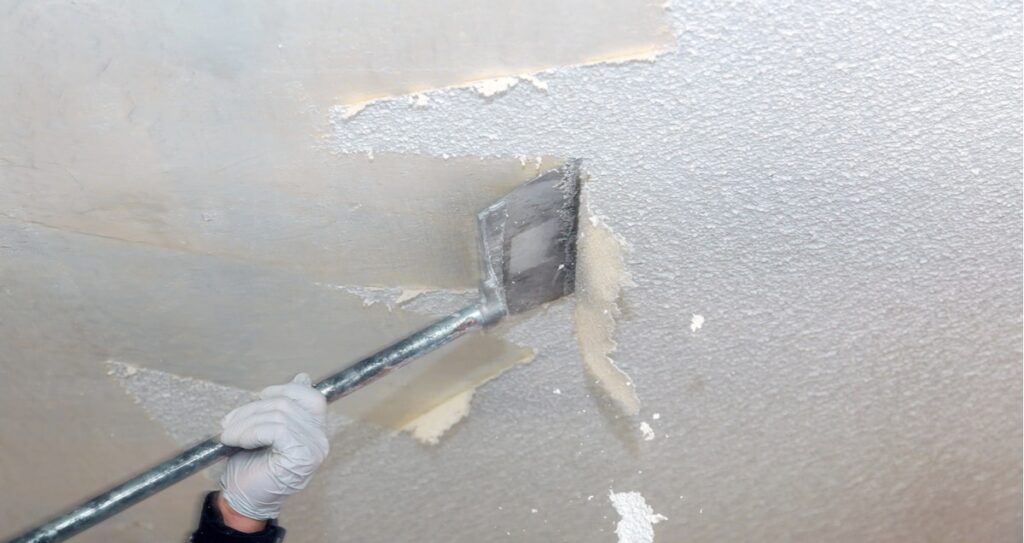
Steps to Popcorn Ceiling Removal

  • Step 1 – Test for Asbestos: If your home was built before the mid-1980s, it’s important to test the ceiling for asbestos. You can test by using an EPA-approved kit or by hiring a licensed contractor. Disturbing asbestos can pose serious health risks so don’t skip this step! It’s a legal and safety necessity. Plan accordingly because lab testing can take a few days.
  • Step 2 – Prepare the Room: Begin by removing all furniture or cover them with plastic sheeting to avoid contamination. Use painter’s tape to secure plastic sheeting to baseboards and walls. Remember to turn off power to celling fixtures and remove them to avoid electric shock. Keep the room well-ventilated to help with drying and air circulation during and after removal. This phase is essential to protect your home’s interior and minimize cleanup time afterward.
  • Step 3 – Moisten the Ceiling: Fill a spray bottle or garden sprayer with warm water. Lightly mist a manageable section, around 5×5 feet, and let it soak for 15 to 20 minutes. How to remove popcorn ceiling that has been painted? If this is the case, water might not penetrate well, so you may need to repeat the misting or try spraying the surface gently. Keeping the texture moist makes scraping significantly easier and reduces airborne dust.
  • Step 4 – Scrape Off the Texture: Use a drywall scraper or wide putty knife and gently remove the moistened texture. Hold the tool at about a 30-degree angle to avoid gouging the ceiling surface. Be patient and work slowly to prevent damaging the drywall. Some areas may be more stubborn, requiring repeated spraying and careful attention.
  • Step 5 – Repair and Sand: After removing popcorn ceilings, closely inspect the area for dents, gouges, or even patches. Fill any imperfections using joint compound, then allow it to dry thoroughly. Sand the entire ceiling using a pole sander or sanding block to achieve a flat, uniform finish. You need a smooth ceiling for a seamless paint job, and proper sanding is what sets a beautiful finish apart.
  • Step 6 – Clean Up: Carefully roll up and dispose of plastic sheeting to avoid spreading debris. Thoroughly clean the room using a shop vacuum with a HEPA filter and be extra mindful of corners and crevices. Wipe down surfaces, walls, and floors with a damp cloth to eliminate remaining dust. 
  • Step 7 – Prime and Paint: Apply a ceiling-specific primer to seal the surface and provide an even based for your topcoat. Once the primer dries completely, follow with high-quality ceiling paint in your desired finish. Popular choices include matte, flat, or eggshell.

Aftercare

A little maintenance goes a long way in preserving the look and longevity of your new ceiling finish.

When to Call Professionals for Painted or Unpainted Stucco Ceiling Removal

While you can learn how to remove a popcorn ceiling yourself, certain situations warrant calling professionals for their expertise:

  • Asbestos Presence: If asbestos is detected, it’s legally required to properly remove this hazardous material. Certified tradespeople follow strict protocols to make sure removal is done safely.
  • Extensive Areas: Large or multi-room projects are labour-intensive. A trained contractor can complete the job more efficiently with less disruption to your home.
  • Ceiling Damage: Water stains, sagging drywall, or prior patchwork might indicate underlying issues. Experts can handle necessary repairs to deliver smooth, lasting results.
  • Time Constraints: If you’re short on time, hiring professionals can save up to weeks of labour. Their prior experience allows them to complete a project in a timely fashion.

Prestige Painting & Contracting offers licensed and insured popcorn ceiling removal services. We promise to deliver safety, quality workmanship, and a clean, modern finish with minimal disruption to your home.

FAQs:

Can a popcorn ceiling be removed if it has been painted?

Yes, a popcorn ceiling can be removed if it has been painted. However, it will be more challenging to remove as the paint seals the texture, preventing water from penetrating. This may require dry scraping or applying a skim coat over the texture. In some cases, we recommend installing new drywall over the existing ceiling for the best results.

 Is it worth it to remove a popcorn ceiling?

Absolutely! It is worth removing a popcorn ceiling to increase your home’s value and appeal, especially if you’re planning to sell. It also allows for easier cleaning, eliminates potential allergens, and provides a sleeker, updated appearance that aligns with modern interior trends.

How do I know if a popcorn ceiling has asbestos?

The only definitive way to determine if a popcorn ceiling has asbestos is through testing. You can purchase an asbestos testing kit or hire a specialized contractor to collect and analyze a sample. Do not attempt to disturb the ceiling before confirming it’s asbestos-free to avoid health risks.

Is it safe to remove popcorn ceiling yourself?

It is generally safe to remove popcorn ceilings yourself if the ceiling is free of asbestos and you take proper safety precautions such as wearing protective gear and making sure the room is well ventilated. However, if asbestos is present, we recommend reaching out to the Prestige Painting & Contracting team for popcorn ceiling removal. Additionally, if you’re unsure about the process, it’s best to consult with experts to make sure the job is done safely and correctly.

How Much Does it Cost to Remove Popcorn Ceiling?

Removing a popcorn ceiling is one of the easiest and most cost-effective ways to upgrade the look of your home. Homeowners can expect to pay between $5 to $7 per square foot. Like with any renovation project, always make sure to budget for cost overruns in the range of 10% so you can be sure you are getting your project done right and to your expectations. If your home also requires the removal of asbestos, expect to pay $10 to $20 per square foot.

What is the Best Method for Removing Popcorn Ceilings?

There are many ways to remove popcorn ceilings, but the best way is through dry or wet scraping. Using care and the right tools, you can easily remove popcorn ceilings so they are suitable for painting or other treatments.
Here are 4 simple tips to help you get rid of the popcorn ceiling:
– Prep Your Work Area
– Remove all furniture and cover walls and floors. Remove any ceiling fixtures and cover holes or outlets to prevent damage.
Dampen Ceiling – Popcorn ceiling is best removed with a bit of water to help loosen up the material. Remember to work in small sections to avoid getting your ceiling too wet.
Take Your Time – Let the water soak into your ceiling before you begin work. This usually takes about 15 mins. Give the ceiling time to dry before moving on to the next step.
– Final Touches – Fill any gaps, cracks, or gouges before sanding and priming your ceiling for painting. This will ensure a flawless paint application and a beautiful-looking ceiling when the job is done.

Do Popcorn Ceilings Have Asbestos?

Many popcorn ceilings installed before 1980 contain asbestos. Wearing a mask, scrape a sample from your ceiling, and have your local health department do a test. You can also find asbestos testing kits online.

What to Do if Your Popcorn Ceilings Have Asbestos?

Asbestos is a potential cancer-causing chemical and should be removed by experts. If your ceiling is found to have asbestos, do not attempt to remove it yourself. A professional removal company has the necessary tools and personal protection equipment to ensure the safe and complete removal of asbestos. If you are taking the project on yourself, you have two choices in lessening the risk to your health.

How to Encapsulate Asbestos Popcorn Ceiling?

Encapsulating a popcorn ceiling is an effective way of minimizing the risks associated with asbestos. A fire-rated 1-inch membrane is applied over the asbestos and stretched to prevent the escape of asbestos. No drilling is done during this process to prevent exposure.

How to Remove Asbestos Popcorn Ceiling?

Anyone involved in the removal of asbestos should wear the right personal protection equipment including masks, hazmat suits, and goggles.
– Scraping – Scraping can be used for the removal of popcorn ceilings that contain asbestos. Make sure that all materials are collected in biohazard bags and disposed of safely and legally. Consult your local municipality to see what the guidelines are for asbestos removal.
– Sanding – Sanding usually works well on ceilings that have not been painted. Use a professional drywall sander. Use a shop vac to collect any dust or debris.
– Skim Coating – Cover the popcorn ceiling with mud. This will create a new coating that you can sand to create a smooth finish.
– Overlay – This puts a new layer of sheetrock over the existing ceiling, giving you a new surface. This can be expensive, up to $3 per square foot.
Remember, never handle asbestos with your bare hands or without protective gear. Even minimal exposure can lead to breathing problems. Always consult with a professional before trying to remove asbestos from your home.

Can popcorn ceilings cause health problems?

Popcorn ceilings can cause several health issues. As popcorn ceilings chip and break down over time, asbestos can become airborne. Inhaling these particles can lead to asbestosis, mesothelioma, and lung cancer.
The effects of long-term asbestos exposure may not show up for years. By that time it is often too late for effective treatments. Homeowners who live in a home built before 1980 should test for the presence of asbestos and have it removed immediately.

If you are ready to update the look of your ceiling and get rid of that old, outdated popcorn appearance, contact Prestige Painting and Contracting. Our professional and friendly crew can help you safely and effectively remove your popcorn ceiling so that you can breathe easily. It is a smart choice to hire a professional to remove a popcorn ceiling that contains asbestos. This will ensure the complete and safe removal of any potentially dangerous particles and materials.

Homeowners in Vaughan and the surrounding area trust Prestige to provide them with expert work at a price that fits their budget. Contact us today for a free quote and let us give your ceiling a brand new look.

Prestige Painting GTA